Lighting: A Light to Guide You
Proper lighting makes or breaks a video. Sure, lighting might not seem as crucial as a nice 4K camera, but its role is nonetheless essential. Even if we acknowledge this truth, simply throwing bulbs and soft-boxes on a person won’t make them look like a sunlit Leonardo DiCaprio standing on the Titanic (for many reasons). Thankfully, there is a method to the madness of choosing the best lights and lighting techniques to get you closer to that perfect music video.
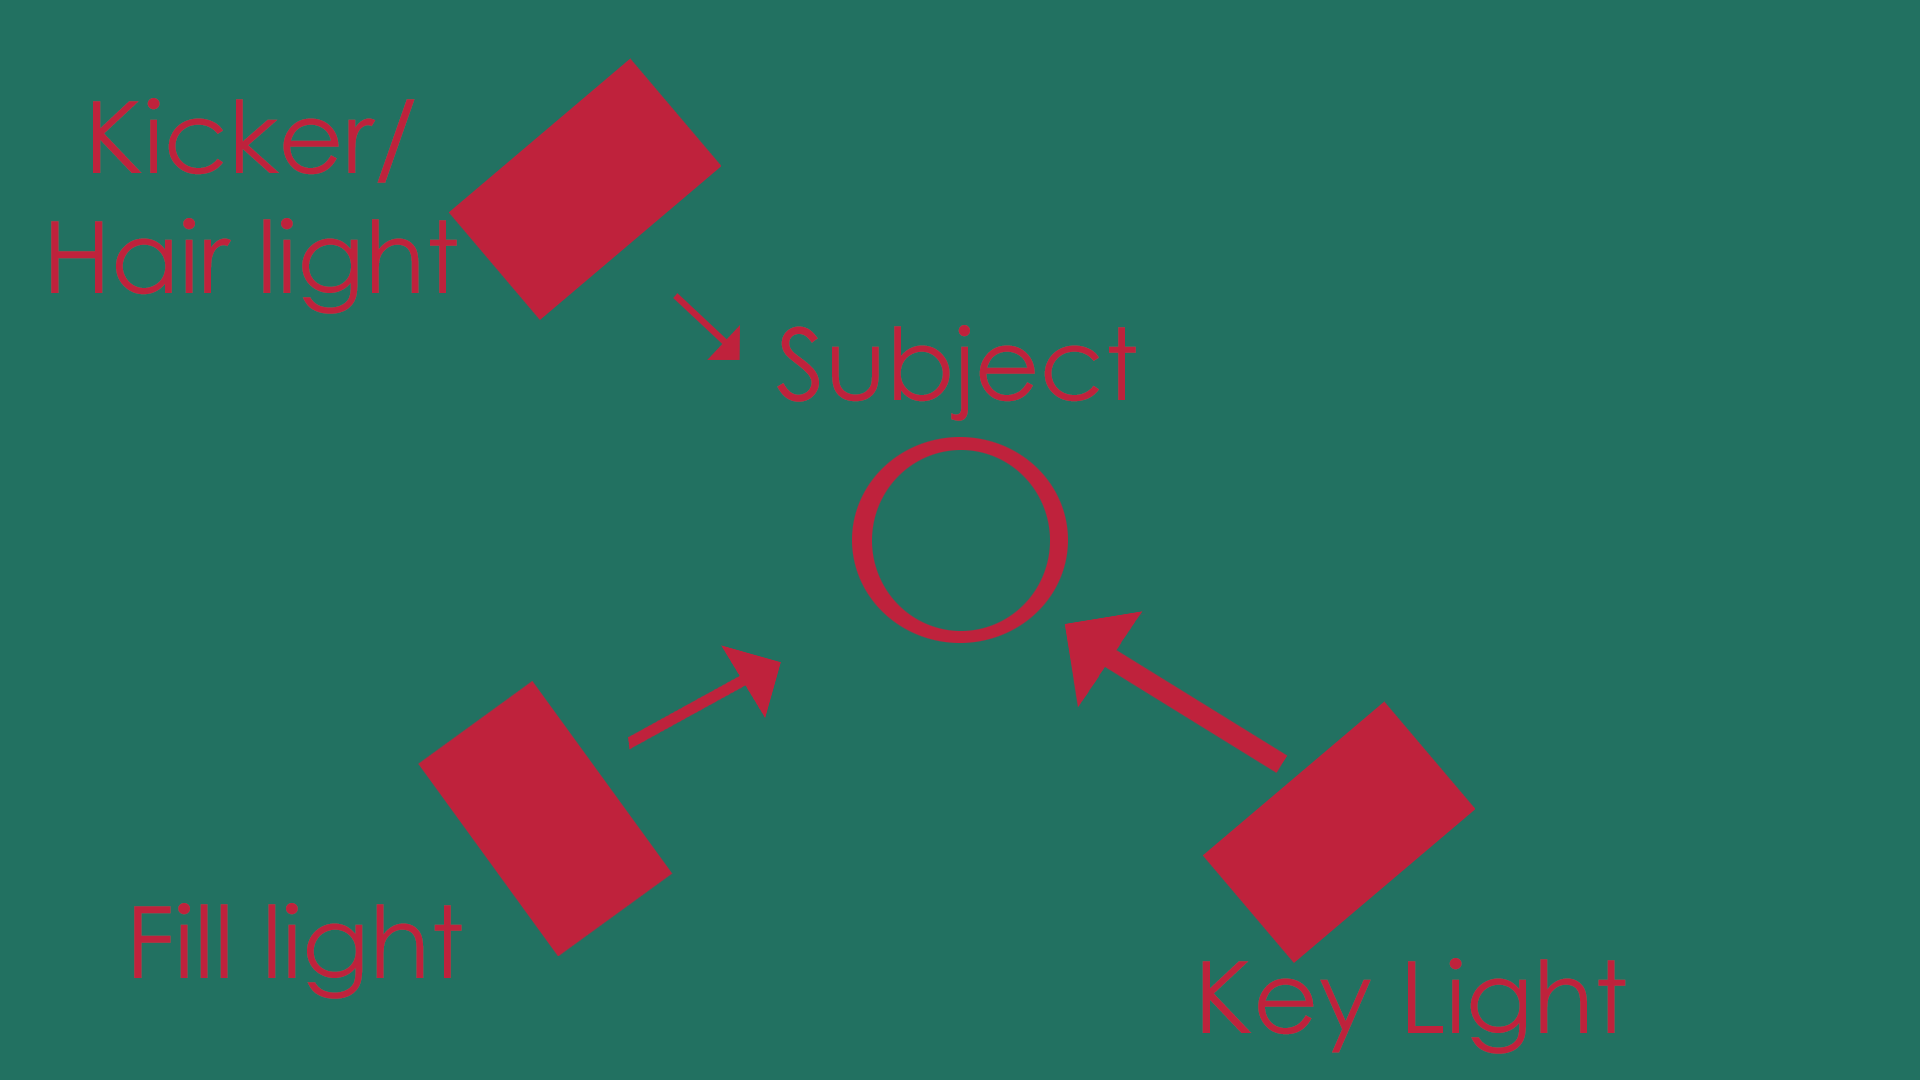
The first thing you need to understand is Light Positioning. The most common lighting setup you will see is called Three Point Lighting. This is comprised of the following: key light, fill light, and the hair/kicker light.
The key light and fill light are in front of you, and the kicker/hair light is behind you, thus creating the three points in a triangle! To break down each type of light, the key light is your brightest light so you’ll position it on the side that you want lit the most. The fill light is your next most powerful light, and it’s positioned on the opposite side of the key light, filling in the shadow caused by the fill (note that you can replace a fill light with reflectors as well). The last light is the kicker/hair light, the dimmest one that is traditionally positioned behind you. The job of this light is to add a bit more definition to yourself and to separate yourself from the background almost like an outline.
Now, we can discuss the strength and harshness of your lights. Controlling the harshness of your lights can be a powerful technique for storytelling.
You may want to emulate soft sunlight, or you may want to create harsh spot lights like on a stage, or you may want to enable detailed shadows for a noir scene. Making a light softer is called diffusion, a technique that both reduces the light strength while making it effectively larger. You can do this by either obstructing your light with a diffuser--such as a filter, sheet, thin shirt, etc.--or by bouncing the light source off a white wall, ceiling, or panel. This will make the light very soft, but it will also drop the amount of light that is hitting the subject. With some experimentation, and additional read-ups on “practical lighting” and “background lighting”, you can master the art of lighting your subject exactly how your scene needs them.
Although these techniques may seem to require a lot of uncommon gear for musicians, you can still buy just the essentials without breaking the bank. We’ve come up with a barebones, but fully-fledged, lighting setup for under $40 that allows you to perform key/fill lighting, diffusion, and more great techniques.
Lightbulbs
Wattage: The power behind the bulb. Unlike a standard 60W house bulb, we suggest a 500W one to light your subjects.
CRI/Quality: A 80 or 90+ CRI Quality Light ensures that it lights the colors of your subject accurately.
Color Temperature: Measured in Kelvin, often compared to white, daylight, tungsten, etc. Consider Daylight as 5000K, indoor lights as 3000K and compensate in your camera’s white balance settings. Warm (lower value) bulbs will be yellower by comparison.
Power/Stand
Clamp Lights: Inexpensive, simple means to power your bulb and attach it to a stand, wall, couch etc.
Umbrella Lights: Somewhat affordable, harsher light diffusion, but can fold up and be taken anywhere.
Diffusion
Softboxes: More expensive but softer, more natural diffusion. Very common and recommended for lighting Green-Screens and subjects alike.
China Balls: Similar to a softbox, but can be bought very cheap
Diffusion Cloth: Inexpensive, versatile, and can help dial back harsh light.
This guide is largely comprised of introductory techniques and suggestions to help create balanced lighting, but there is also a world of unique lighting setups, specialized equipment, and interpretation across each method. Within the online cover community, there are hundreds of cases where Halloween projectors, RGB floodlights, flashlights, and other unconventional items are brought into the studio for unique looks. Combine gear, omit and modify what works on your budget and project, and you’ll be sure to have a more lit video (pun intended).
Editor’s Note: Peter is currently raising money for his short film. If you enjoyed this article, please consider supporting him!

Peter Gillette
Peter Gillette is an independent filmmaker who’s worked with a variety of VGM artists. He released a short documentary on VGM back in June. In addition to working with VGM, he’s done work for Princeton University.